Hot Honey Chicken Biscuits Recipe: The Ultimate Comfort Food Guide
If you’re searching for a show-stopping dish that combines crispy fried chicken with fluffy homemade biscuits and a sweet-spicy glaze, you’ve found it. Hot honey chicken biscuits deliver an irresistible combination of textures and flavors that will have everyone coming back for seconds. This comprehensive guide will walk you through every step of creating this restaurant-quality dish in your own kitchen.
What Makes Hot Honey Chicken Biscuits Special?
Hot honey chicken biscuits represent the perfect marriage of Southern comfort food traditions. The crispy, seasoned chicken pairs beautifully with tender, buttery biscuits, while the hot honey adds a sophisticated sweet-heat element that elevates the entire dish. Whether you’re preparing brunch for guests, looking for a satisfying dinner option, or planning a special breakfast, this recipe delivers impressive results.
The beauty of this recipe lies in its versatility and the fact that each component can be prepared with simple ingredients you likely already have in your pantry. The combination creates a memorable eating experience that’s both comforting and exciting.
Ingredients You’ll Need
For the Fried Chicken:
- 4-6 chicken breast pieces, pounded to even thickness (approximately half-inch thick)
- 2-3 cups all-purpose flour for dredging
- 2 eggs
- 2-3 tablespoons water
- 2 tablespoons paprika
- 2 tablespoons garlic powder
- Kosher salt (generous pinches)
- Vegetable oil for frying (enough to fill your Dutch oven about 2-3 inches deep)
For the Homemade Biscuits:
- 2 cups all-purpose flour, plus extra for dusting
- 1 tablespoon baking powder
- 1 teaspoon salt
- ½ cup cold butter
- ¾ cup cold buttermilk
For the Hot Honey Glaze:
- ½ cup honey
- 1-2 tablespoons red chili flakes (adjust to taste)
- 1 tablespoon apple cider vinegar
Essential Equipment
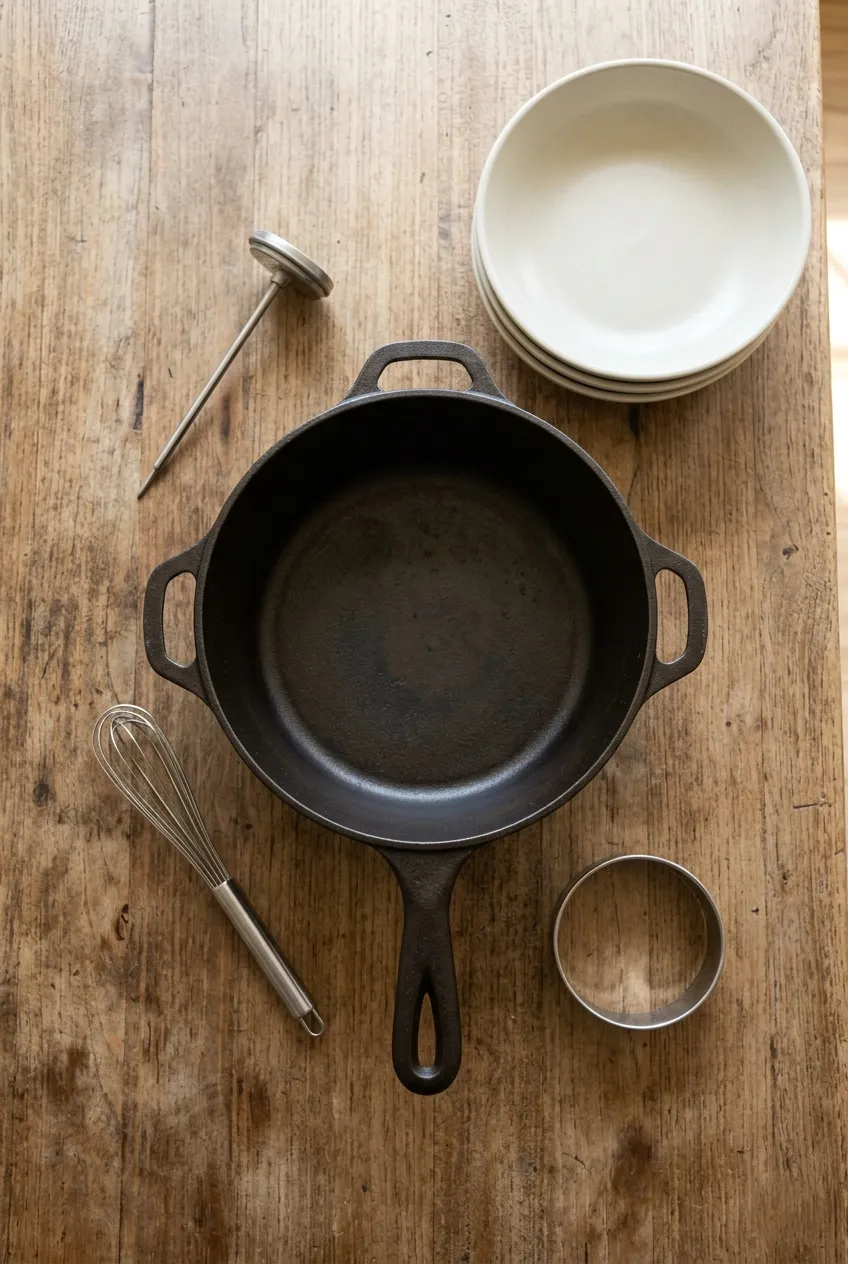
Before you begin, gather these important tools to ensure smooth cooking:
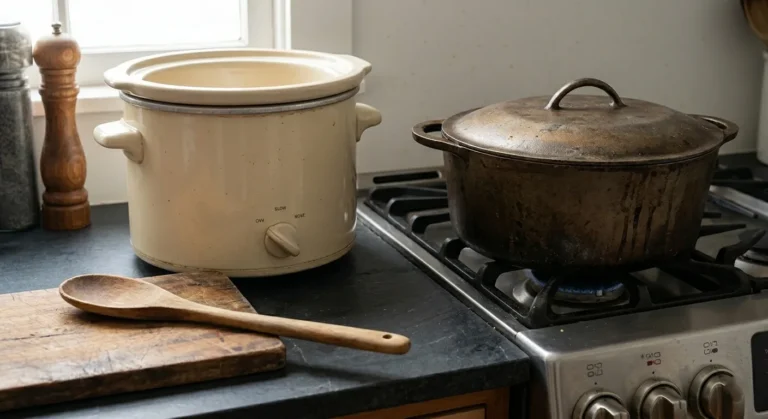
- Dutch oven or deep heavy-bottomed pot for frying
- Meat thermometer (crucial for checking chicken doneness)
- Baking sheet for biscuits
- Box grater for butter
- Biscuit cutter (approximately 2-3 inches in diameter)
- Meat mallet for pounding chicken
- Three shallow bowls for breading station
- Pastry brush for butter
- Small saucepan for hot honey
Step-by-Step Instructions
Preparing Your Workspace

Organization is key when tackling a multi-component recipe like this. Start by preheating your oven to 450°F for the biscuits. This gives you time to prepare other elements while the oven reaches the proper temperature.
Set up your frying station by adding vegetable oil to your Dutch oven. You’ll want enough oil to come up about 2-3 inches on the sides. Begin heating it over medium heat, aiming for a temperature between 350-360°F. Using a thermometer ensures perfect frying results.
Making the Seasoned Flour Mixture
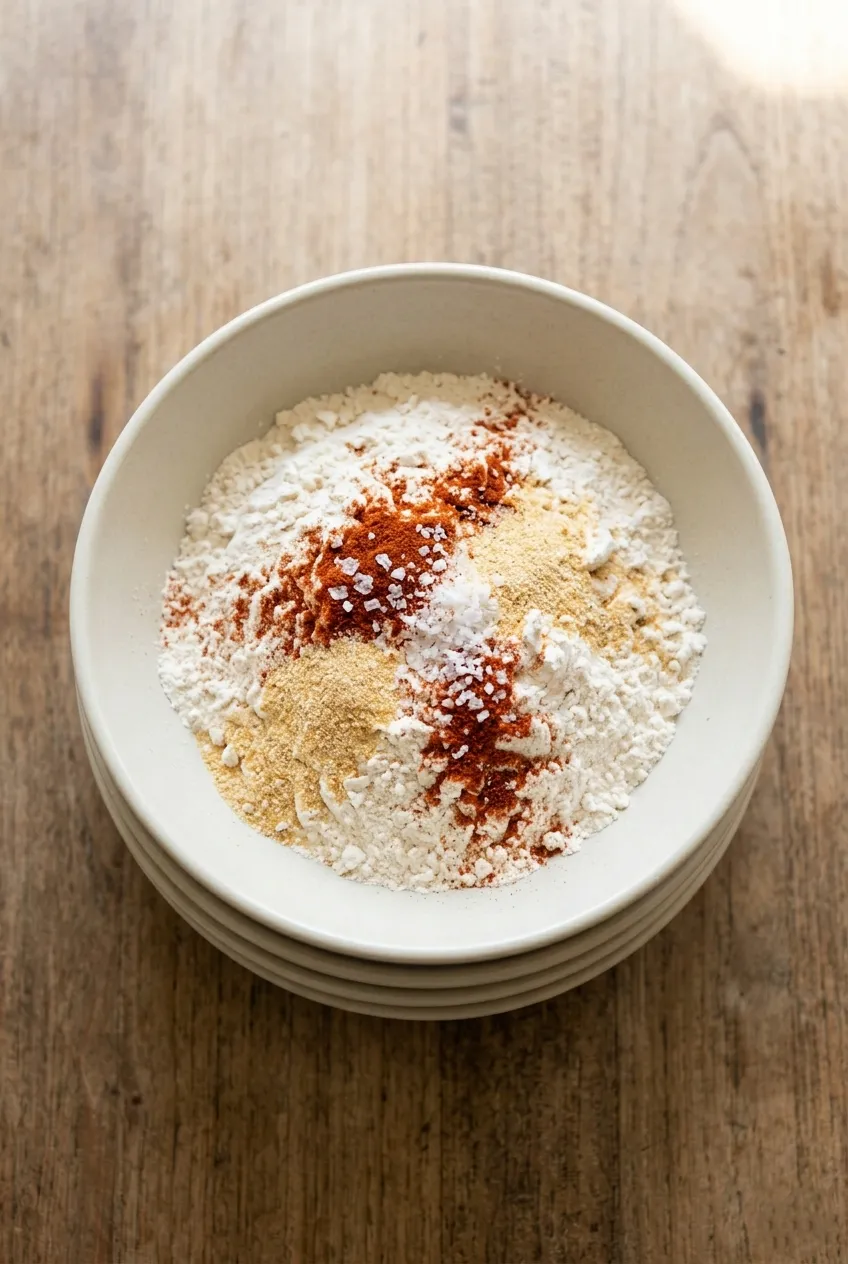
In your first shallow bowl, combine the flour with paprika and garlic powder. Add generous pinches of kosher salt—don’t be shy here, as this is where much of your chicken’s flavor begins. Whisk everything together thoroughly to ensure even distribution of the seasonings throughout the flour.
Remember, the measurements provided are your starting point. Feel free to adjust the seasonings based on your preferences. Some cooks like adding additional spices like onion powder, cayenne pepper, or black pepper to customize their coating.
Preparing the Chicken
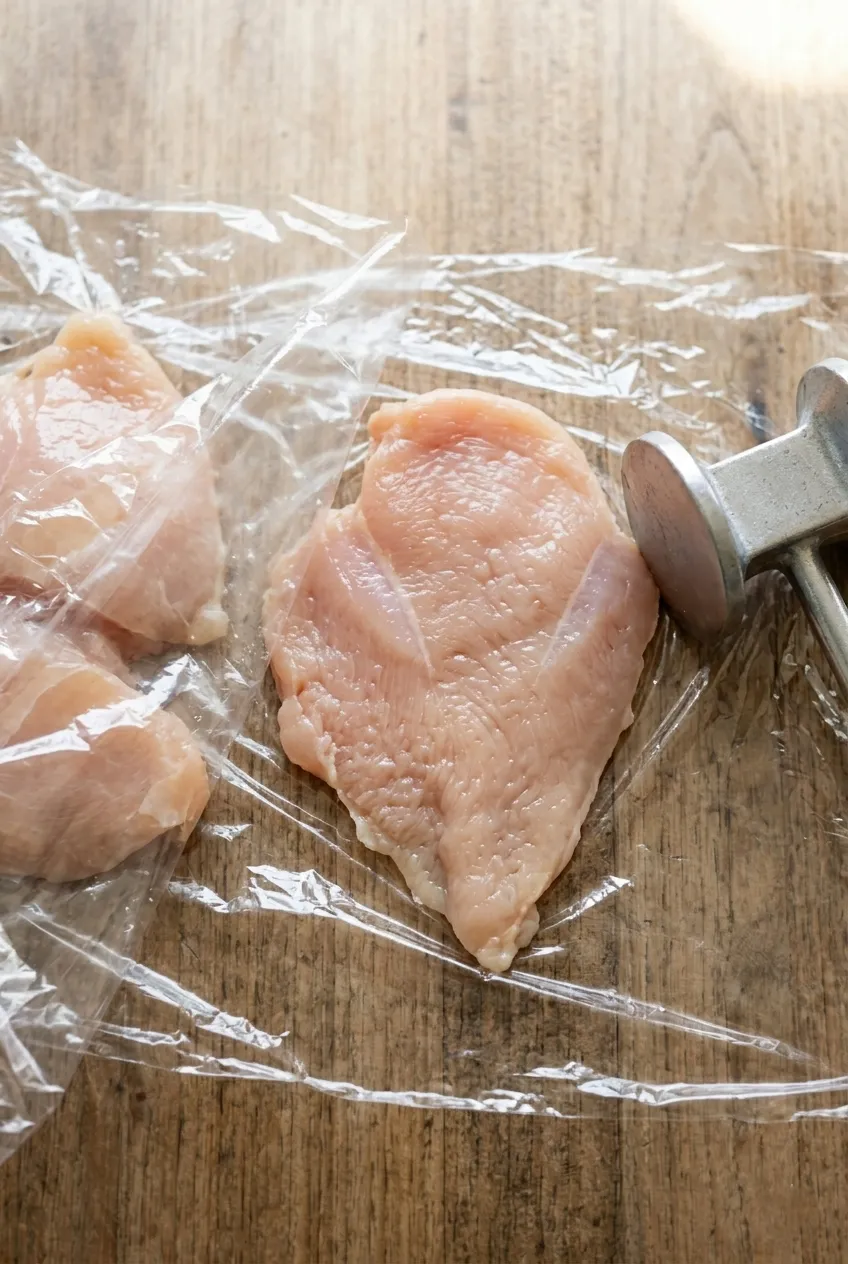
Take your chicken breast pieces and place them between sheets of plastic wrap or parchment paper. Using a meat mallet or the smooth side of a meat tenderizer, pound the chicken to an even thickness of approximately half an inch. This crucial step ensures even cooking—thinner pieces cook through without burning the exterior, while uniform thickness means all pieces finish at the same time.
The goal is to have pieces roughly the size of your biscuits, making assembly easier later. If your chicken breasts are particularly large, consider cutting them into smaller portions before pounding.
Setting Up Your Breading Station
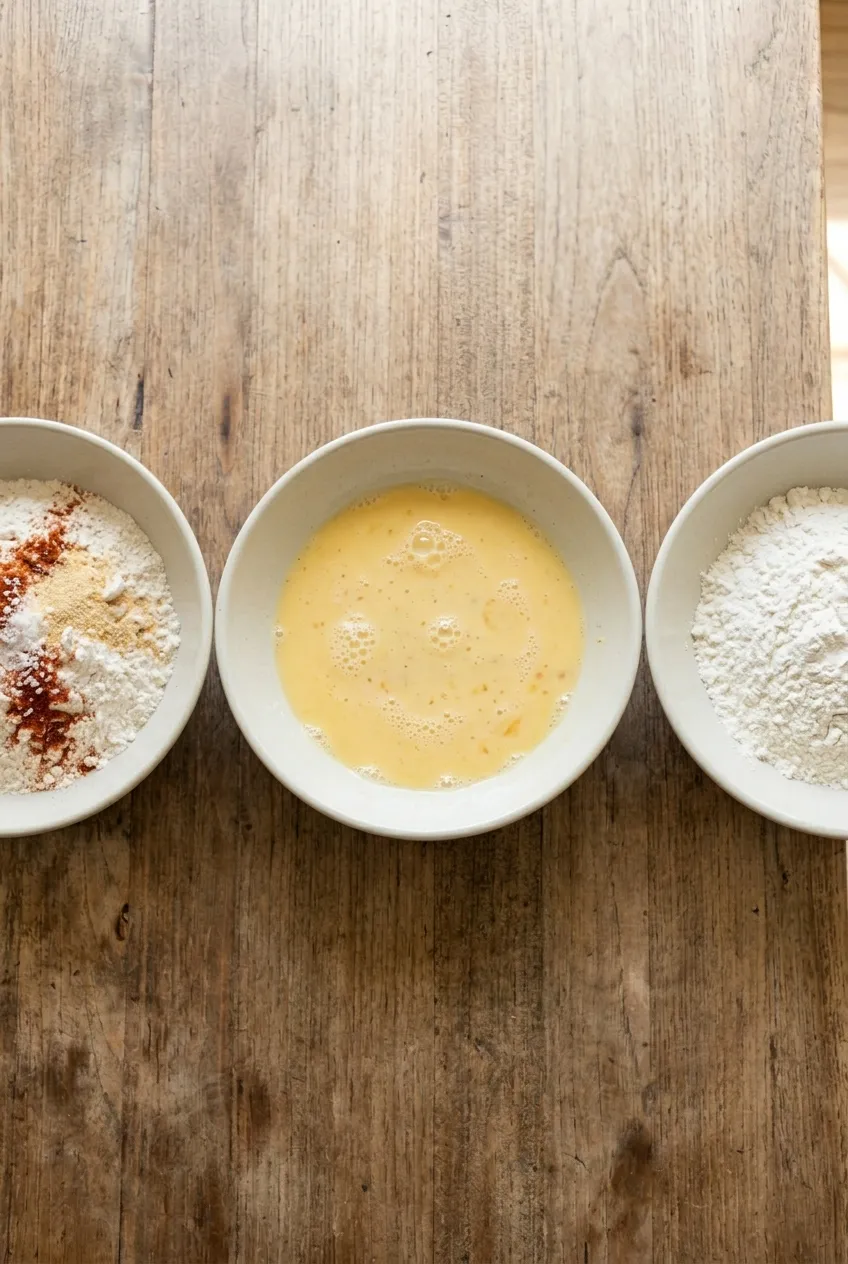
Create an efficient three-bowl system for breading:
Bowl 1: Your seasoned flour mixture Bowl 2: Whisk together 2 eggs with 2-3 tablespoons of water until well combined Bowl 3: Plain flour for the final coating
The key to successful breading is keeping one hand designated as your “dry” hand and one as your “wet” hand. This prevents your fingers from becoming coated in sticky breading.
The Breading Process
Here’s the technique that ensures crispy, well-coated chicken:
- Take a pounded chicken piece and place it in the seasoned flour (Bowl 1), coating both sides thoroughly
- Transfer to the egg wash (Bowl 2), ensuring complete coverage
- Return to the seasoned flour, pressing the coating into the chicken and getting it into all the crevices
- Shake off excess flour gently
- Place on a staging plate while you bread the remaining pieces
This double-dredge method creates a substantial, crispy coating that stays attached during frying.
Frying the Chicken
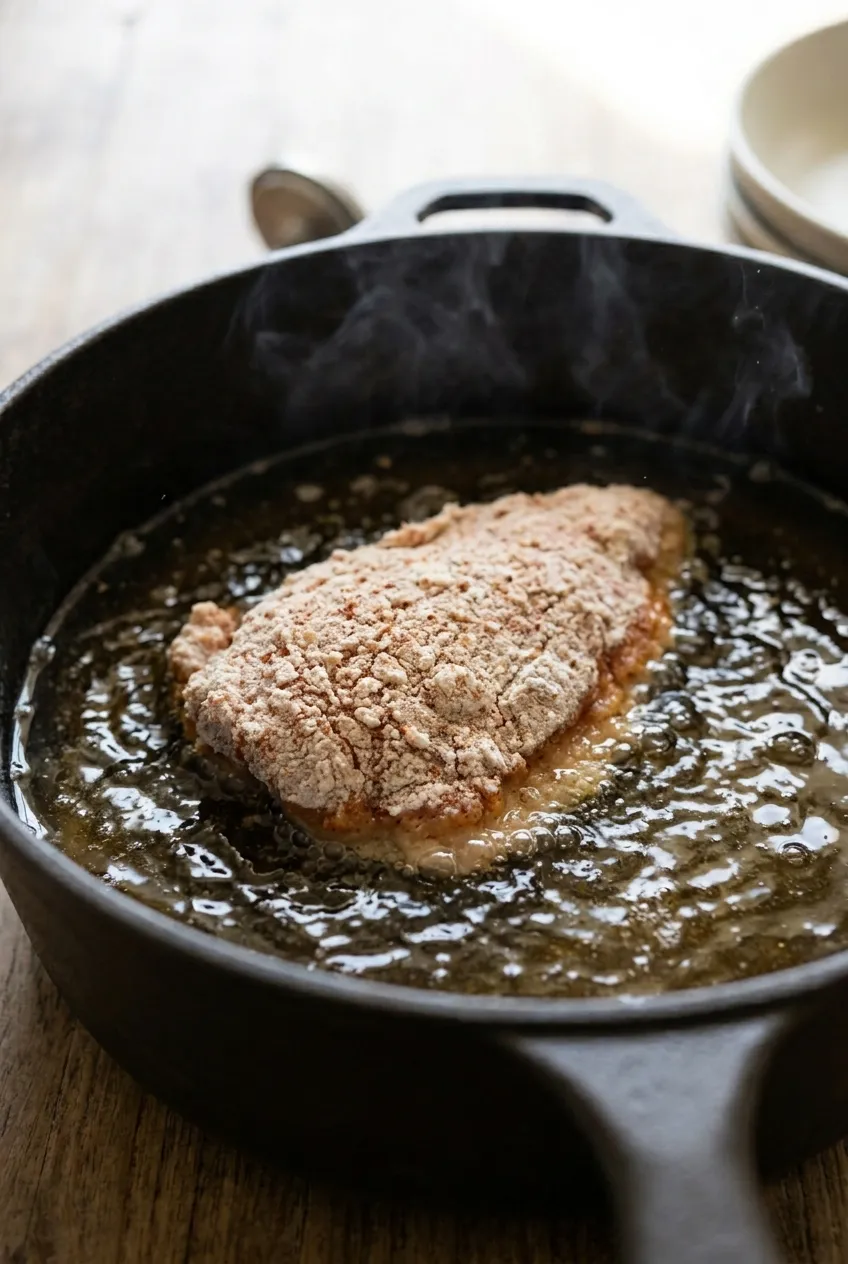
Once your oil reaches 350-360°F, it’s time to fry. Carefully lower each breaded chicken piece into the oil, placing it away from you to avoid oil splashes. Don’t overcrowd the pot—fry in batches if necessary to maintain oil temperature.
Fry the chicken for approximately 8-12 minutes total, flipping halfway through, until the coating is deep golden brown and the internal temperature reaches 165°F. Using a meat thermometer is non-negotiable here—it’s the only reliable way to ensure food safety while avoiding overcooked, dry chicken.
As pieces finish, transfer them to a wire rack set over a baking sheet. This allows excess oil to drip away while keeping the bottom of your chicken crispy.
Making the Biscuits
While your chicken rests, prepare the biscuits. In a large bowl, whisk together flour, baking powder, and salt. The bowl should be generously sized—working in a cramped space makes the process unnecessarily difficult.
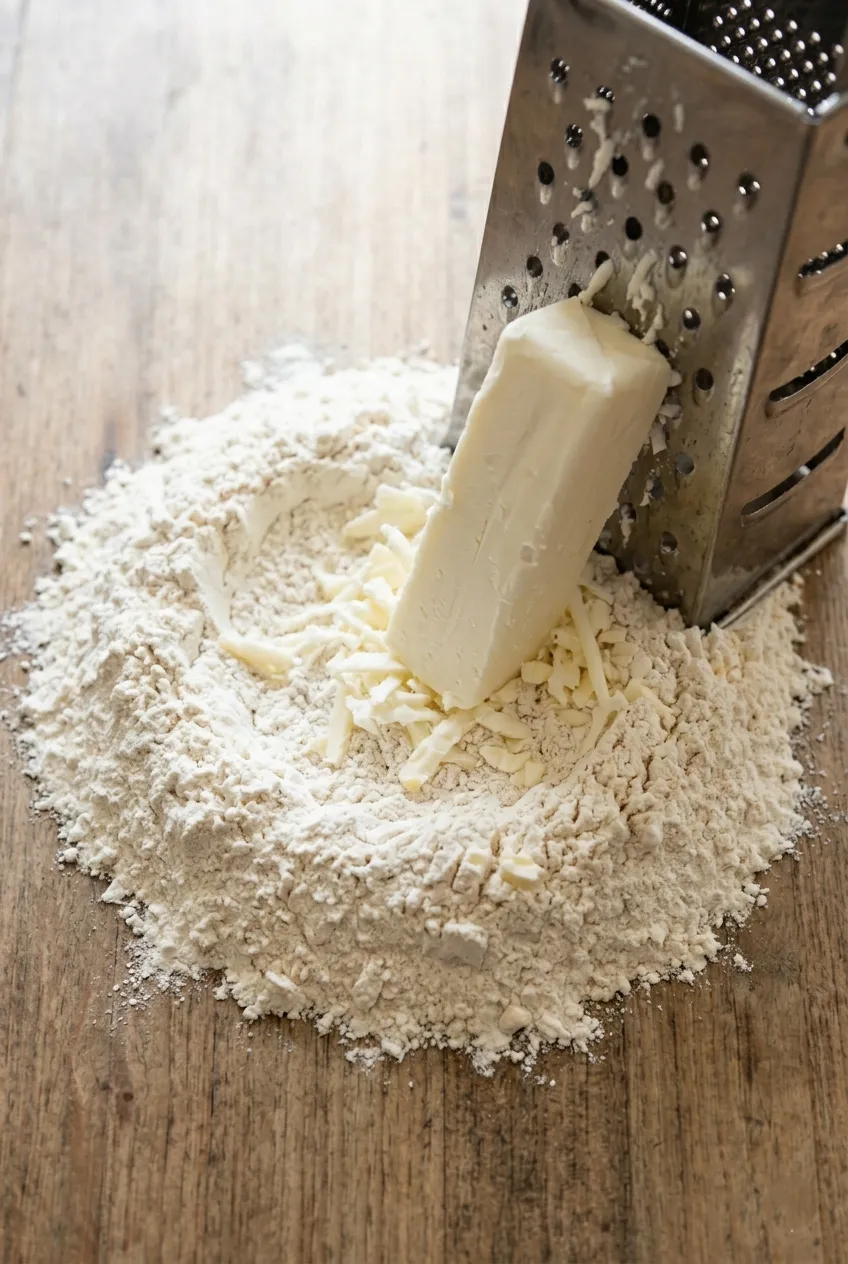
Take your cold butter (this is important—warm butter won’t create the flaky layers you want) and grate it using a box grater directly into the flour mixture. You can use the large holes or smaller holes depending on preference, though larger holes work faster.
Using your fingertips, work the grated butter into the flour mixture until it resembles coarse crumbs. You want to see visible butter pieces throughout—these create steam pockets during baking that result in flaky, layered biscuits.
Create a well in the center of the flour mixture and pour in the cold buttermilk. Using a fork or your hands, gently fold the mixture together until it forms a shaggy dough. Don’t overwork it—a few dry patches are fine. Overworking develops gluten, which creates tough biscuits.
Shaping and Baking the Biscuits
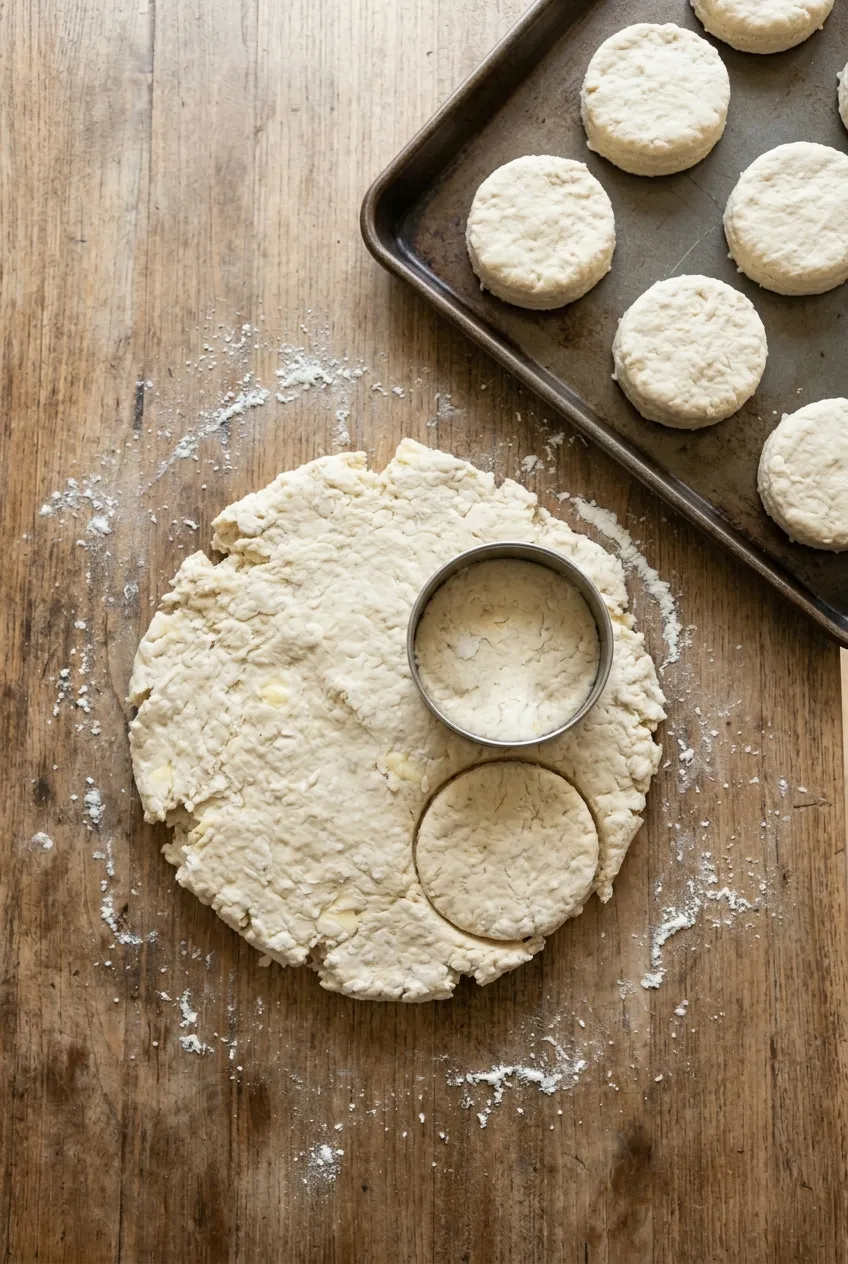
Lightly flour your work surface and turn out the dough. Pat or gently roll it to about half-inch thickness. Using your biscuit cutter, cut straight down without twisting—twisting seals the edges and prevents proper rising.
Place biscuits on a baking sheet, leaving about an inch between them. Gather scraps, gently pat together (again, minimal handling), and cut additional biscuits.
Bake at 450°F for 15-17 minutes, until the tops are golden brown. While they bake, melt some additional butter. As soon as the biscuits come out of the oven, brush the tops generously with melted butter. The butter seeps into the cracks and crevices, adding incredible flavor and creating a beautiful sheen.
Preparing the Hot Honey
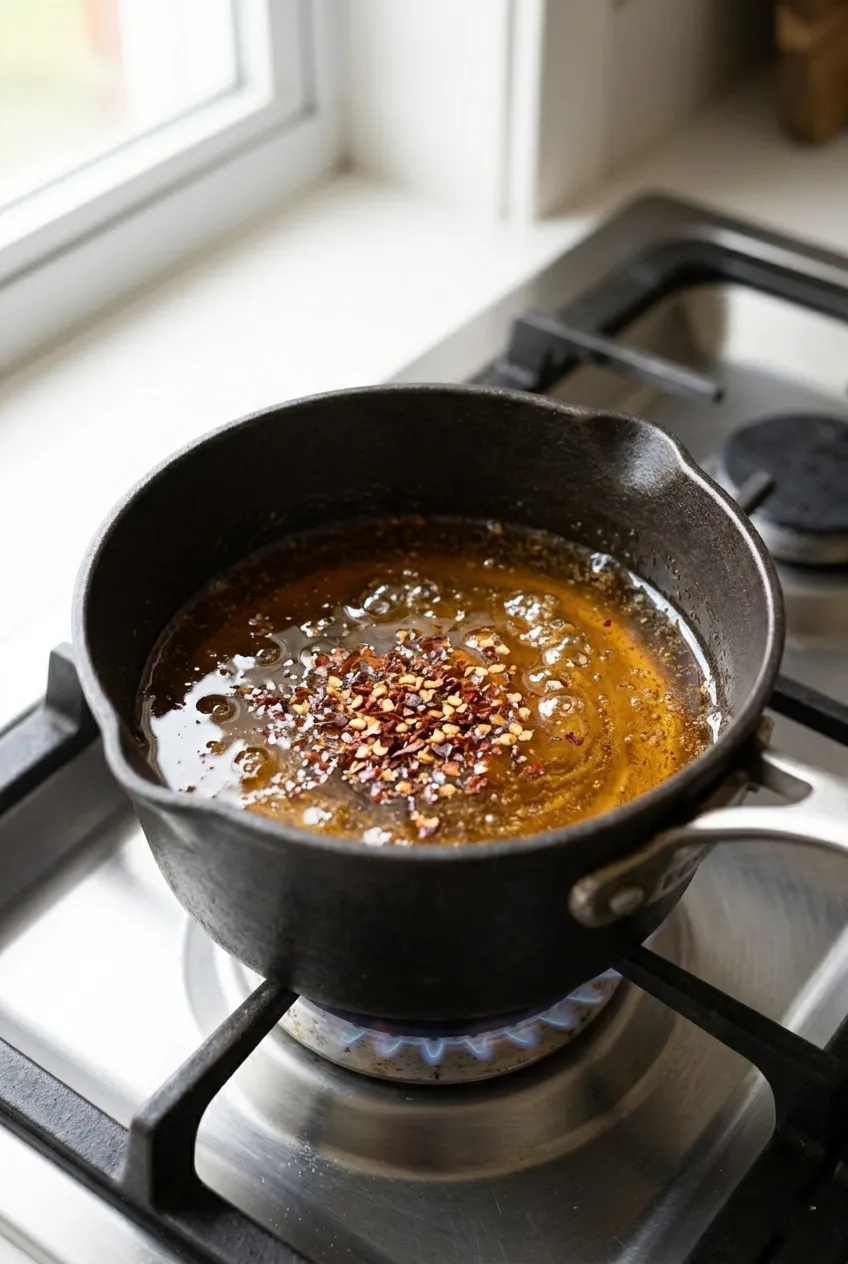
In a small saucepan over low heat, add your honey. Warm it gently until it becomes more liquid and reaches a gentle simmer—don’t let it boil vigorously or it may burn.
Once simmering, remove from heat and stir in the red chili flakes. The amount you use depends on your heat tolerance—start with one tablespoon for mild heat, or go up to two tablespoons for more kick.
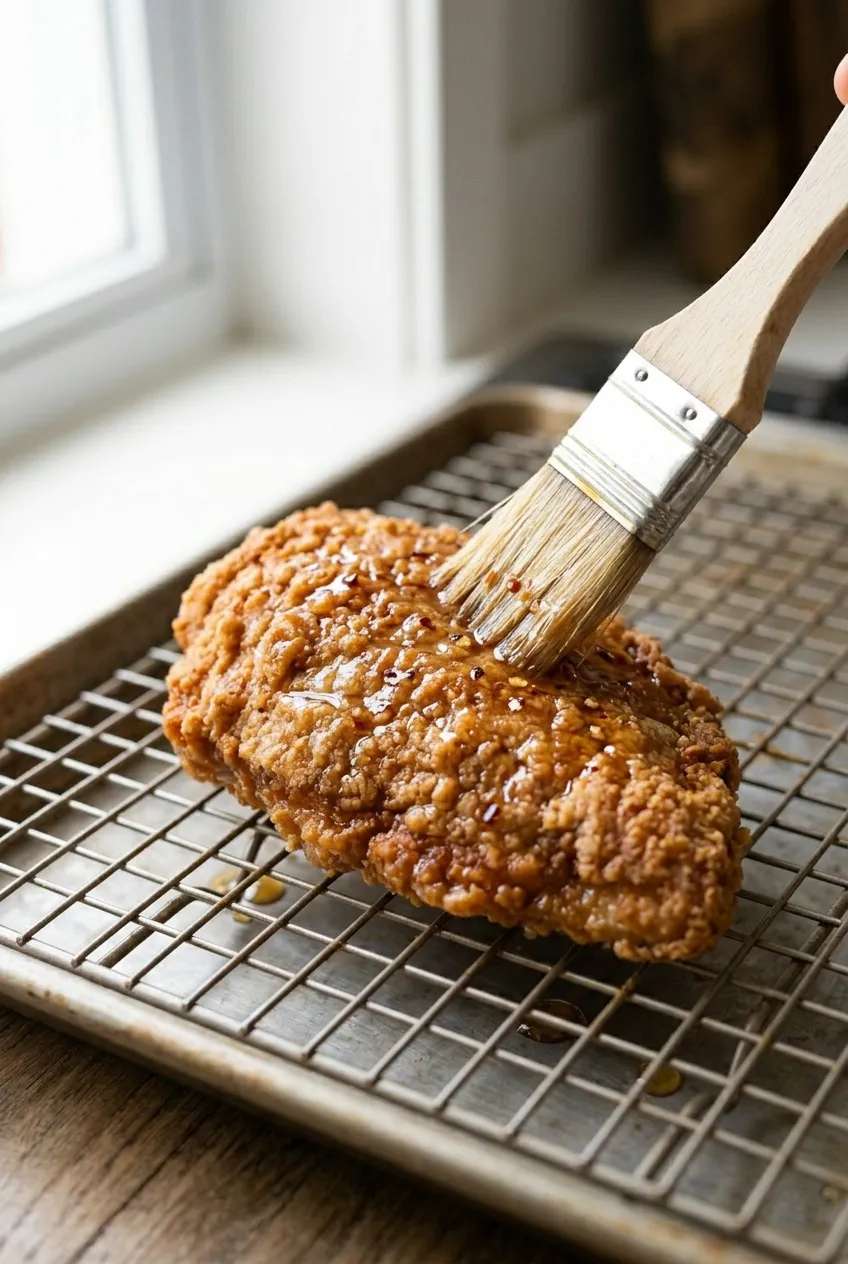
Finally, stir in the apple cider vinegar. This adds a subtle tang that balances the sweetness and cuts through the richness of the fried chicken. Let the mixture cool to room temperature—pouring hot honey directly onto the chicken can make the coating soggy.
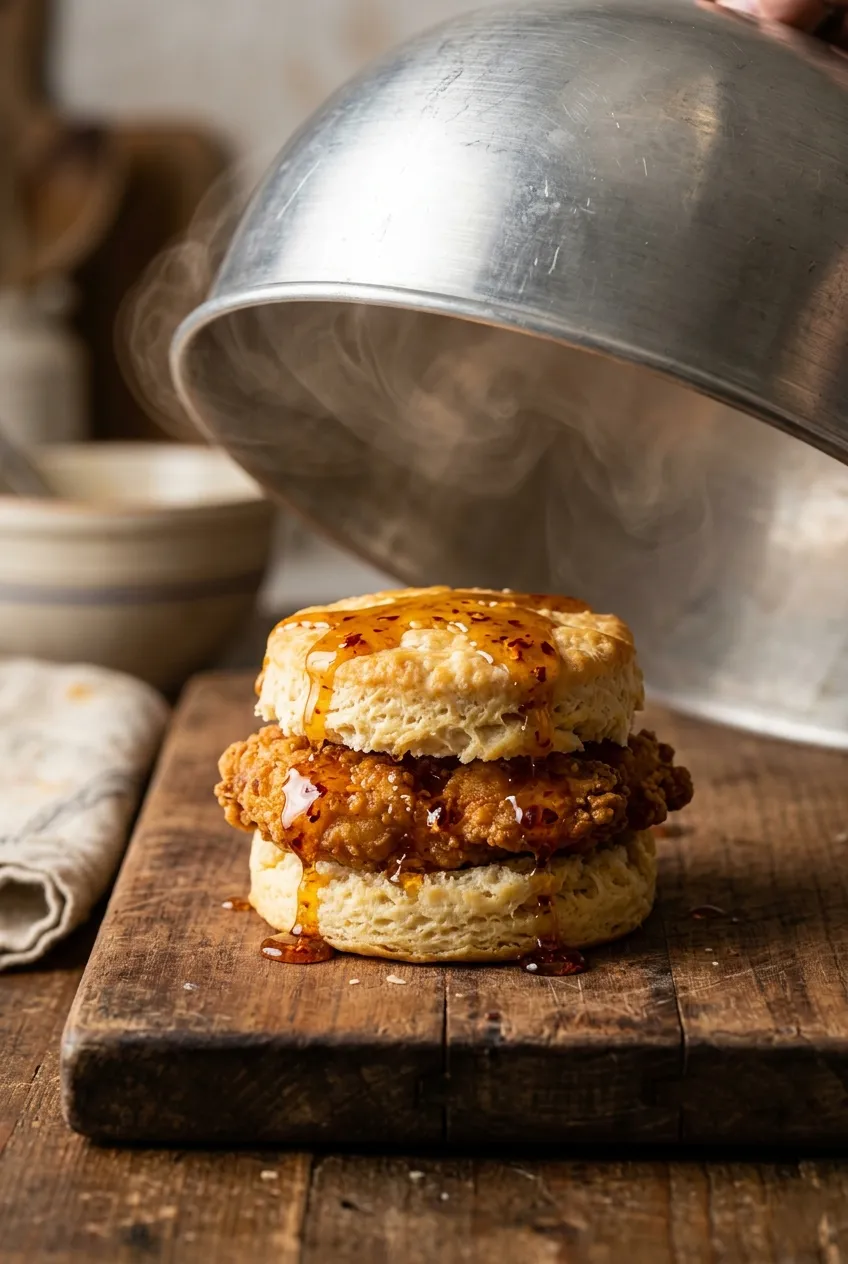
Assembly and Final Touches
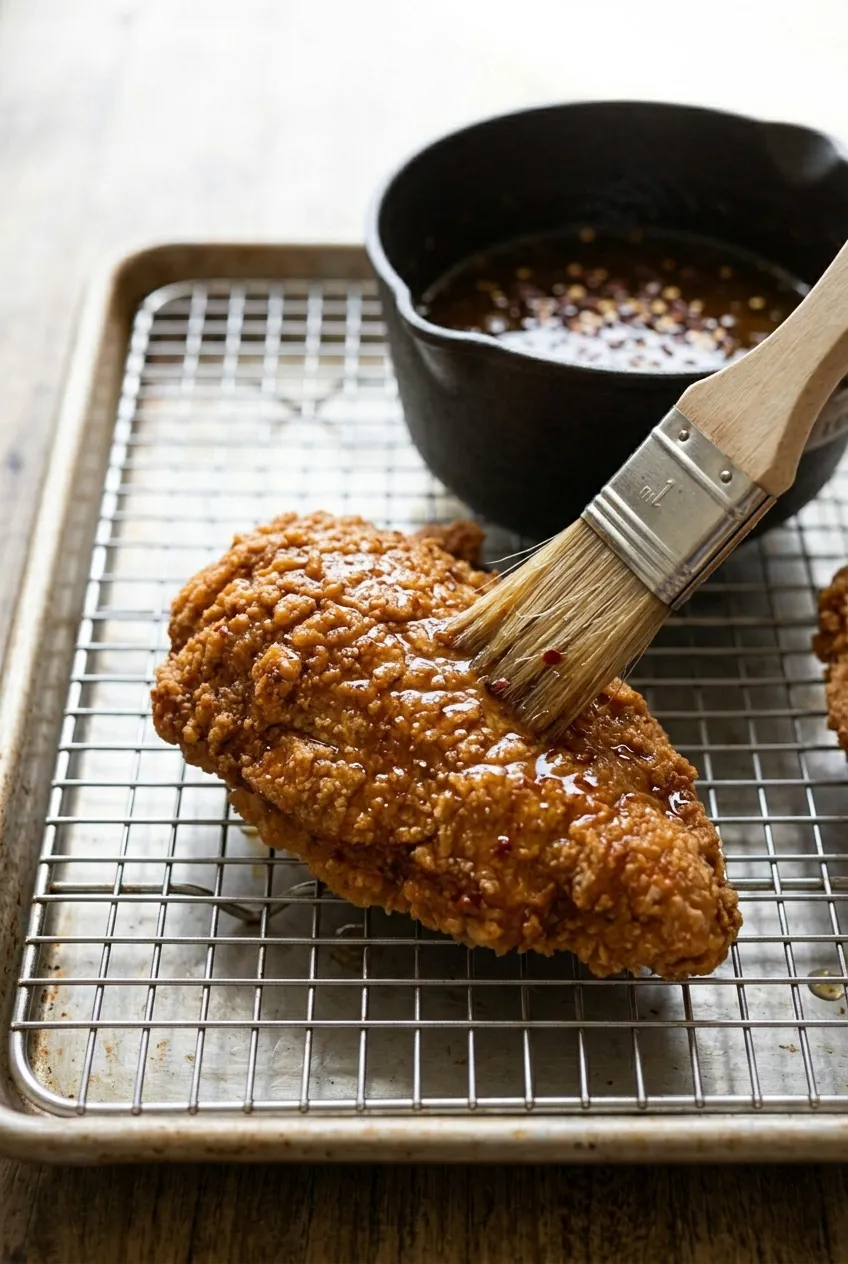
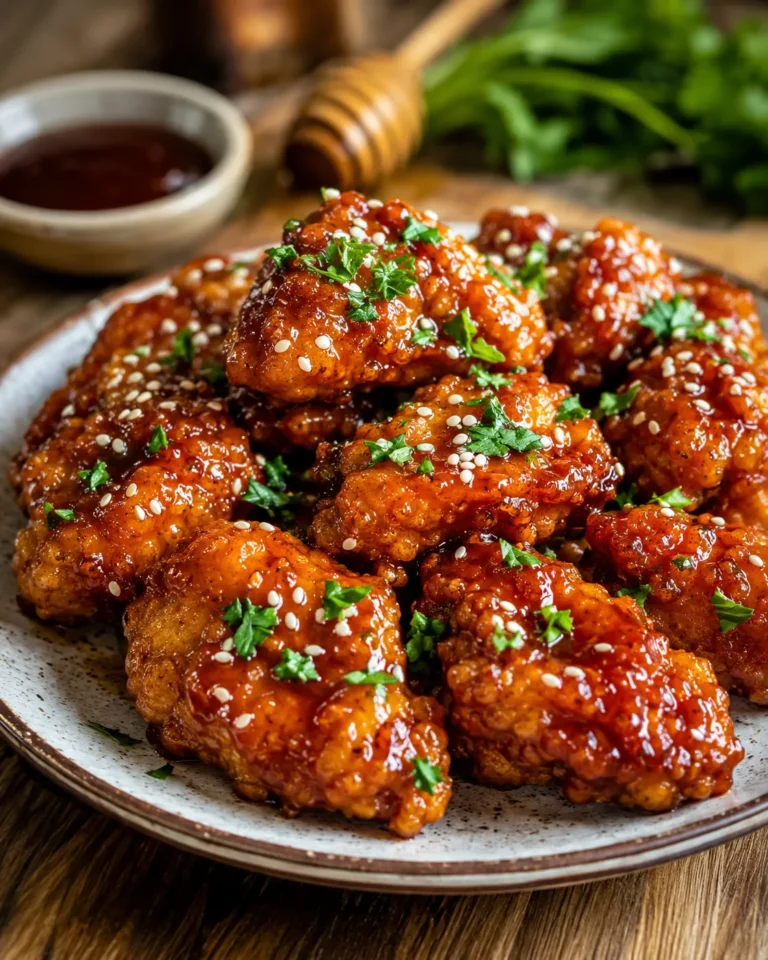
Now comes the best part—bringing everything together. Generously drizzle or brush the cooled hot honey over your fried chicken pieces. Don’t be stingy here; the honey creates a glossy coating that delivers that signature sweet-spicy flavor in every bite.
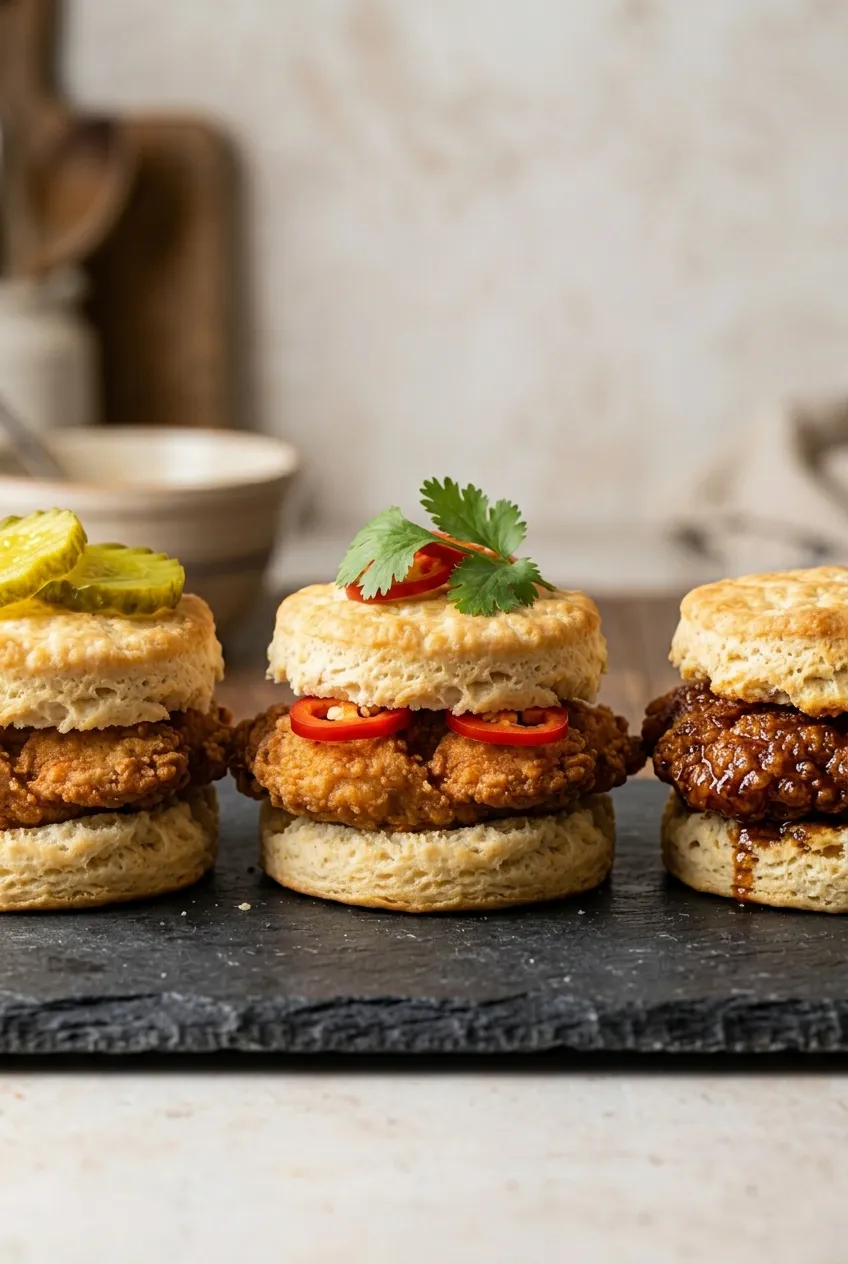
Split your warm biscuits in half. Place a hot honey-glazed chicken piece on the bottom half, then crown it with the top. The result is a beautiful, towering sandwich that’s as delicious as it looks.
Pro Tips for Perfect Results
Temperature Control: Maintaining consistent oil temperature is crucial. If the oil is too cool, your chicken absorbs excess oil and becomes greasy. Too hot, and the exterior burns before the interior cooks through. Invest in a good thermometer.
Cold Ingredients for Biscuits: Keep your butter and buttermilk refrigerated until the moment you use them. Cold fat creates steam during baking, which produces those coveted flaky layers.
Don’t Skip the Pounding: Even thickness means even cooking. This simple step prevents dry, overcooked edges and raw centers.
Rest Your Chicken: Allow fried chicken to rest for a few minutes after cooking. This lets the juices redistribute and the coating to set.
Fresh is Best: While you can prepare components ahead, these sandwiches are best assembled and served immediately for maximum crispiness and warmth.
Serving Suggestions
Hot honey chicken biscuits work beautifully for various occasions:
- Brunch spread: Serve alongside fresh fruit, scrambled eggs, and coffee
- Game day food: Cut into smaller portions for easy eating
- Dinner option: Pair with coleslaw, potato salad, or roasted vegetables
- Special breakfast: Elevate your morning with this indulgent treat
Consider setting up a DIY station where guests can assemble their own, with the hot honey on the side for those who prefer varying heat levels.
Storage and Reheating
Fried Chicken: Store in an airtight container in the refrigerator for up to 3 days. Reheat in a 350°F oven for 10-15 minutes to restore crispiness. Avoid microwaving, which makes the coating soggy.
Biscuits: Best enjoyed fresh, but can be stored in an airtight container at room temperature for 2 days. Warm in a 300°F oven before serving.
Hot Honey: Keeps at room temperature in a sealed container for several weeks. The flavor actually develops over time as the chili flakes infuse the honey.
Variations to Try
Spice Level: Adjust the heat by varying the amount of chili flakes, or experiment with different types like Aleppo pepper or crushed red pepper.
Different Cuts: While breast meat works wonderfully, chicken thighs offer more flavor and stay juicier. Just adjust cooking time accordingly.
Buttermilk Brine: For even more tender chicken, brine the pieces in buttermilk for 2-4 hours before breading.
Herb Addition: Add fresh herbs like thyme or rosemary to your biscuit dough for extra dimension.
Extra Toppings: Consider adding pickles, lettuce, or a drizzle of ranch dressing for additional layers of flavor.
Frequently Asked Questions
Conclusion
Hot honey chicken biscuits represent comfort food at its finest—crispy, juicy fried chicken nestled in buttery, flaky biscuits, all brought together with a sweet and spicy honey glaze that ties everything together perfectly. While this recipe involves multiple components, each step is straightforward and manageable, even for home cooks who might be intimidated by frying or biscuit-making.
The beauty of this dish lies not just in its incredible flavor, but in its versatility. Serve it for a special weekend brunch, prepare it for a casual dinner, or make it the star of your next gathering. The combination of textures—crispy coating, tender chicken, fluffy biscuits—and the balance of sweet honey with spicy heat creates an unforgettable eating experience.
Don’t be afraid to make this recipe your own by adjusting seasonings, heat levels, or even adding your favorite toppings. The foundation is solid, but there’s plenty of room for creativity and personalization.
Remember, the key to success lies in maintaining proper temperatures for frying, using cold ingredients for the biscuits, and not rushing any of the steps. Take your time, follow the instructions, and you’ll be rewarded with a dish that looks and tastes like it came from a high-end brunch spot.
Once you master this recipe, it’ll become a go-to in your cooking repertoire—a guaranteed crowd-pleaser that showcases your skills in the kitchen. So gather your ingredients, heat up that oil, and get ready to create something truly special. Your family and friends will be talking about these hot honey chicken biscuits long after the last crumb has disappeared.